Smart Shelly with Home Assistant
I am looking to improve my smart home installation as I plan to move to a new appartment. I already have a well functioning Home Assistant installation with a ton of automations (like lights that automatically come on when light level outside drops, that dim when it is time to go to sleep, robot vaccum that runs when everyone is away and also automation that lets us know when CO2 levels are too high and we should ventilate). We have colorful smart lights that can be dimmed or can change colors as the mood strikes.
However, one big problem that my setup currently has is that physical light switches on the walls can not be used to control the lights (as in - if the wall switch turns the light off, there is no way to turn it back on via Home Assistant) and if the Home Assistant goes down (which does sometimes happen, usually when I am away for a longer time) then it is really hard to control the lights without it.
So I've been searching for a holy grail: combination of smart (or smartified) light switches on the walls and smart light bulbs (with colors and dimming) that works with automations when Home Assistant is online and also just works directly to power lights on and off when Home Assistant is offline.
And I think I have found a solution that will be acceptable for me. The solution involves taking a normal dumb light installation, putting in smart light bulbs (any that Home Assistant can manage) and then wiring in a Shelly next to an existing dumb wall switch. For design consistency sake it would be good if the wall switch is of impulse type (so only connecting the connectors when the button is being pressed, like a doorbell button), but the setup should also work for normal toggle wall switches with minimal changes. Some settings on the Shelly and a custom Shelly script will take care of offline functionality. Note: Gen1 Shelly devices do not have scripting capabilities, you need a Gen2 device to do this, like the linked Shelly Plus.
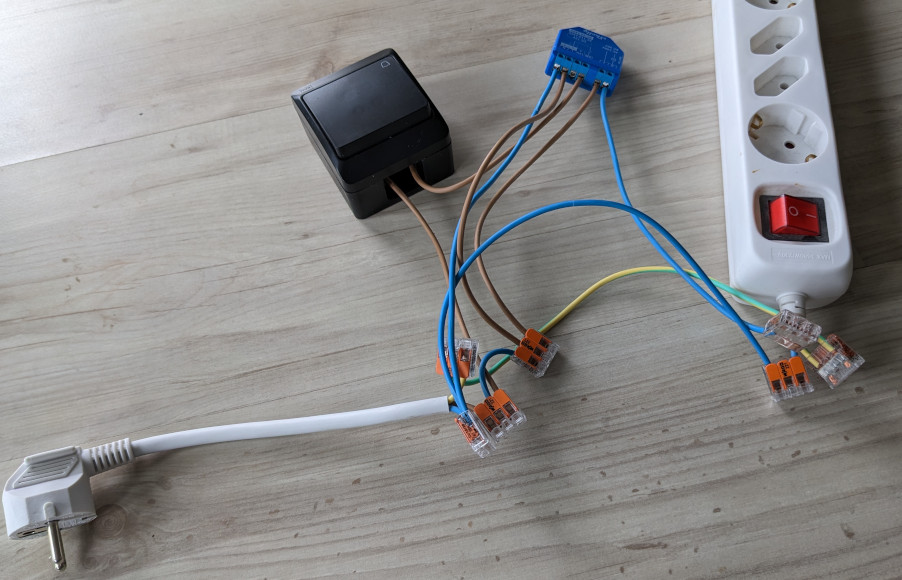
So first I created a test setup to validate my design. I took an old extension cable with a damaged wire, cut out the damaged part and split up the wiring to make my test setup. It was really convinient to use the right tools - a simple cable stripper, a precise wire stripper and best wire connectors. Using the right tools it was really easy, fast and also safe to just pull insulation from the cable, split up the wires, clean off exactly 10mm off the end of each wire and push them into the Wago connectors to connect them together.
The completed test setup is a bit janky, but it works and is electrically safe (at least for testing purposes). The wiring is pretty clear from Shelly documentation (which is also just printed on the front of the device itself). The only point of clarification is that on the output side the Shelly is a relay and not a power provider, which means that when connecting Shelly to the wires going towards your lights it is not enough to just wire Shelly output one to lights live wire and Shelly output zero to lights neutral wire. Instead you need to connect you input neutral wire directly to your lights neutral (same as input ground) and then wire the input live wire trough the Shelly output contacts (so input live to Shelly output zero and Shelly output one to lights live wire). Except if you but a Shelly Plus 1PM, which has to measure power consumption and thus has to pass the whole device current trough itself to properly measure it.
When that is done, tested and plugged in you can use Shelly app to connect to your new Shelly device and make it join your WiFi network (or you can just use a laptop or a phone to joint to the Shelly ad-hoc WiFi network and configure it via its build-in web UI). When the Shelly is in your network you can continue to configure via the Web UI and Home Assistant.
Add the Shelly to your Home Assistant installation (it will automatically detect a new Shelly device and promt to enable Shelly integration once the device shows up in the local WiFi network). Add an automation to toggle the light state of the connected smart bulb(s) (Service: Light toggle) when "First button button down" event triggers on the Shelly. This will be the way the light state is going to be controlled normally. It can also be useful to add an automation that runs on Home Assistant start-up to ask all Shelly devices to turn outputs to on, so that after recovery of Home Assistant after an outage you can
In the Shelly web UI (after updating firmware, as usual) you'd want to disconnect output from input, set input type to button (assuming you have an impulse button input, like I do) and configure the output to be powered on by default when power comes back. And then you'll want to add this script to your Shelly. You will want to adjust the URL to your Home Assistant instance there. This script monitors if the Home Assistant is alive or not and if the Home Assistant is not alive, then take the matters into its own hands and power off and on the lights directly.
I am sure there are many ways this can be improved and tweaked. I like the flexibility this approach gives - I can cleanly program behaviour in Home Assistant and also directly on the Shelly switches (without even having to flash any custom firmware). This particular way is also quite scalable - if I have 10 Shelly switches in my home I can have exactly the same script and settings on all of them - the link between the switch and the light(s) is done via physical wiring and via automation settings in Home Assistant. The Shelly does not have to know what smart lights (or other devices) are connected to it and how they are supposed to be controlled.
If you are using MQTT with Home Assistant, then Shelly can also speak directly to MQTT instead and the online check becomes much more trivial because the MQTT object in the Shelly Script API has isConnected property.